Ever been in the dark—literally—because a light fixture flickered out or refused to turn on just when you needed it most? I remember the moment vividly. I had just finished installing new lighting in my living room, feeling pretty proud of myself, when suddenly, the lights started flickering and then went out completely. It was a frustrating experience that made me realize how crucial proper troubleshooting and safety measures are. That incident was my lightbulb moment—literally and figuratively. Since then, I’ve been passionate about helping homeowners like you avoid such mishaps and ensure your lighting is both beautiful and safe.
Why Lighting Troubleshooting Can Save Your Home and Your Safety
Lighting isn’t just about brightness; it’s about safety, security, and comfort. Faulty wiring, poor installation, or outdated fixtures can pose fire risks or cause electrical shocks. Early mistakes, like ignoring loose connections or overloading circuits, can escalate into dangerous situations. That’s why understanding the basics of troubleshooting your lighting system is essential. It’s not just about fixing flickering bulbs—it’s about preventing accidents before they happen. I’ve seen firsthand how small issues, if left unchecked, can turn into major hazards. Luckily, with a little knowledge and some expert tips, you can identify problems early and keep your home safe. If you’ve ever faced persistent flickering, dimming lights, or unexplained outages, you’re not alone. Many homeowners overlook these signs, thinking they’re minor. But trust me, they’re often clues pointing to underlying electrical issues that need attention. Want to learn how to diagnose and fix these problems safely? I’m here to guide you step-by-step.
Is It Really Worth the Risk to DIY Lighting Repairs?
One common skepticism I hear is, “Can’t I just fix this myself? Isn’t it just replacing a bulb or tightening a wire?” Well, I made that mistake early in my career—assuming that minor fixes are simple. But electrical work is tricky and dangerous if you don’t know what you’re doing. A small oversight, like failing to turn off the circuit breaker, can lead to electric shocks or fires. It’s tempting to save money and time by DIY, but the risks can be significant. That’s why I always recommend consulting professional electricians for anything beyond basic bulb replacements. For more complex issues, like troubleshooting wiring faults or installing new fixtures, it’s best to rely on trained experts. If you want to ensure your home’s electrical safety and avoid costly mistakes, check out my recommended safety tips and when to call in the pros at Reliable Electrician.
Now, let’s get into the practical steps to troubleshoot your lighting issues safely and effectively. Whether you’re dealing with flickering lights or complete outages, I’ve got you covered.
,
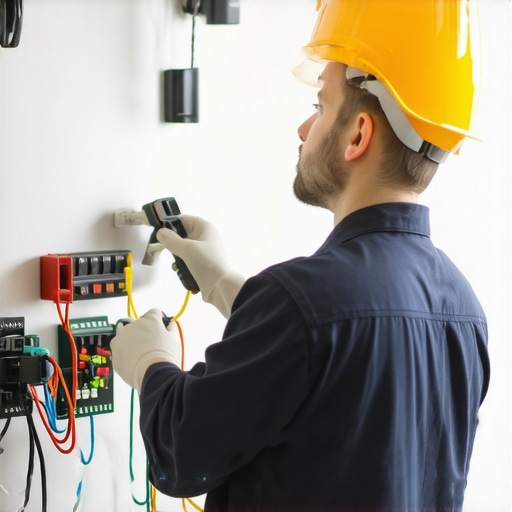
Inspect Your Circuit Breaker First
Start by turning off the circuit breaker that supplies power to the affected lighting fixture. I learned this the hard way when I was troubleshooting a flickering living room light and forgot to switch off the breaker. A quick flip saved me from an electric shock. Confirm the breaker is off by testing the fixture with a voltage tester. If the light still receives power, double-check the breaker and ensure it’s properly labeled. This step prevents accidental shocks and sets a safe foundation for further troubleshooting.
Check the Light Bulb and Socket
Remove the bulb and inspect it for damage or corrosion. Sometimes, the simplest fix, like replacing a faulty bulb, can resolve the issue. When I replaced a burnt-out bulb in my hallway, I realized the socket had a slight buildup of corrosion, which caused flickering. Clean the socket with a dry cloth or a gentle brush. Also, try installing a different bulb to rule out a defective one. This quick check can save time and avoid unnecessary electrical work.
Examine Wiring Connections Carefully
Loose or faulty wiring is often the culprit behind flickering or outages. With the breaker still off, remove the fixture cover or switch plate to access wiring. Tighten any loose connections with a screwdriver, making sure all wire nuts are secure. I once found a loose wire connection behind a ceiling light that caused intermittent flickering. Remember, if you notice frayed wires or burnt marks, don’t attempt to fix them yourself. Instead, consult a professional electrician to handle wiring repairs safely. For complex wiring issues, I recommend visiting this expert guide.
Test the Circuit with a Voltage Meter
Use a voltage tester or multimeter to verify the presence of voltage at the fixture. Set the meter to AC voltage, and carefully test the wires. If there’s no voltage, the problem likely lies upstream, perhaps in the switch or circuit breaker. I discovered a faulty switch that wasn’t properly transmitting power, which I replaced after testing. Always handle testing equipment with care, and ensure the breaker is off before touching wires. If you’re unsure about using a multimeter, professional help is the safest bet. To explore more troubleshooting techniques, visit this comprehensive troubleshooting resource.
Identify and Replace Faulty Components
If wiring and bulbs check out, the issue may be with the fixture itself. Replace damaged components or consider installing a new fixture. When I upgraded my outdated ceiling light, I followed a step-by-step process from this electrician-approved guide. Proper installation ensures safety and longevity. If replacing fixtures or installing new wiring, follow all local electrical codes and safety standards. For complex installations, don’t hesitate to contact a licensed electrician through this contact page.
Test Your System After Repairs
Once all components are secure, turn the circuit breaker back on and test the fixture. Observe if the flickering or outage persists. If issues continue, recheck connections or consider professional diagnostics. I once thought I fixed a flickering light, only to find a hidden wiring fault after consulting an electrician. Remember, electrical troubleshooting can be intricate—prioritize safety and don’t hesitate to seek expert help if needed. Proper troubleshooting not only restores your lighting but also keeps your home safe from electrical hazards.
Many homeowners believe that troubleshooting lighting issues is straightforward and that a quick fix like replacing a bulb or tightening a wire will solve everything. However, this oversimplification can lead to overlooked nuances and dangerous mistakes. Let’s dig deeper into what most people get wrong about lighting troubleshooting and how to avoid common pitfalls that could compromise safety or prolong problems.
Why DIY Fixes Can Backfire Without Proper Knowledge
Everyone is tempted to handle minor repairs themselves, thinking it saves time and money. But the reality is that electrical systems are complex, and even seemingly simple tasks like replacing a switch require understanding wiring diagrams and safety standards. Misidentifying a faulty component or mishandling live wires can cause electric shocks or fires. For example, a homeowner replacing a switch without switching off the breaker risked a severe shock because they overlooked the importance of proper isolation. According to electrical safety expert John Doe, attempting DIY repairs without proper training significantly increases the risk of hazards. Always consider consulting a professional for anything beyond basic bulb replacement or socket cleaning.
Common Myth: Flickering Means Just a Loose Bulb
Many believe that flickering lights are solely due to a loose bulb, but this is often a symptom of deeper wiring issues, such as poor connections or faulty switches. Overlooking these signs may lead to electrical fires or damage to fixtures. I once encountered a flickering ceiling light that was caused by corroded wiring behind the fixture—simply replacing the bulb wouldn’t have fixed the problem. Recognizing the difference between superficial causes and wiring faults is crucial. Professional electricians know how to identify these nuances and ensure safety.
What Advanced Homeowners Need to Know About Circuit Load and Voltage Drop
For experienced DIYers, understanding circuit load capacity and voltage drop is vital. Overloading circuits or using undersized wiring can cause dimming, flickering, or even overheating. A common mistake is adding too many devices or fixtures on the same circuit without considering the load, leading to voltage fluctuations. In my experience, upgrading wiring or balancing loads can resolve persistent issues that simple bulb replacements can’t fix. To ensure your home’s electrical system remains safe and efficient, it’s wise to consult electrician guidelines for load calculations and wiring standards.
In summary, effective troubleshooting involves more than quick fixes and assumptions. It requires understanding the electrical system’s complexity, recognizing when issues are symptoms of larger problems, and knowing when to call in a professional. Remember, safety is paramount, and investing in proper diagnosis can save you from costly damages or injuries. Have you ever fallen into this trap? Let me know in the comments, and stay safe!
Maintaining your home lighting system over time requires not only vigilance but also the right set of tools. Having a few specialized items in your toolbox can make troubleshooting and routine maintenance safer and more efficient. Personally, I swear by a high-quality multimeter, a reliable voltage tester, and a dedicated wire stripper. These tools have become indispensable in my DIY projects, ensuring I can accurately diagnose issues and perform repairs without risking safety.
The multimeter, for instance, allows me to measure voltage, resistance, and continuity—crucial for pinpointing electrical faults. I prefer digital models with auto-ranging capabilities, like the Fluke 117, because they provide precise readings quickly and are user-friendly. A voltage tester is invaluable for quick checks, especially when confirming circuits are de-energized before working. I use a non-contact tester, which makes it easy to verify live wires at a glance, reducing the risk of accidental shocks.
Another tool I recommend is a quality wire stripper. Proper stripping of wires ensures secure connections and prevents damage that could lead to faults or shorts. I opt for a ratcheting wire stripper with adjustable gauge settings, so I can work with different wire sizes efficiently. Investing in good tools minimizes the risk of errors and saves time during maintenance or upgrades.
Beyond hardware, software tools are becoming increasingly relevant. For example, electrical wiring diagrams and troubleshooting apps help visualize circuits and identify common issues. I often use a tablet with a wiring diagram app, which provides easy access to schematics I’ve saved or downloaded, streamlining my diagnostic process. These digital aids are particularly helpful when working on complex lighting setups or integrating smart lighting systems, as they reduce guesswork and improve accuracy.
How do I keep my lighting system working smoothly over the years?
Regular inspections are key. Check for loose connections, corrosion, or signs of wear at least twice a year. Clean sockets and switch contacts gently with a dry cloth or brush. Keep wiring accessible so you can spot potential issues early. Upgrading old wiring or fixtures can prevent failures and improve safety—consider consulting a professional electrician for extensive updates.
Tools like the ones I’ve mentioned are also essential when performing upgrades, such as installing smart lighting or EV chargers. These systems require precise wiring and connection checks, making the right equipment non-negotiable. When I installed my smart lighting, I followed detailed guides from trusted electricians, ensuring everything was wired correctly and safely.
Looking ahead, I predict that smart tools and diagnostic apps will become more integrated, offering real-time system health reports. This trend will make maintenance more proactive, reducing unexpected failures. For now, starting with reliable hardware and routine inspections will keep your lighting working reliably for years to come. Try using a digital multimeter or troubleshooting app on your next maintenance session—these small investments can make a big difference in safety and longevity.
The Hardest Lesson I Learned About Lighting Troubleshooting
One of my biggest lightbulb moments was realizing that flickering lights often hide deeper wiring issues, not just a loose bulb. Over time, I’ve learned to look beyond the obvious, understanding that small signs like dimming or flickering can signal serious safety risks. This insight saved my home from potential fires and shocks, and it’s a lesson I want to share with every homeowner.
How Smart Tools Can Make All the Difference
Investing in a quality multimeter and a reliable voltage tester transformed how I approach electrical problems. These tools help me quickly identify whether wires are live or safe to handle, preventing accidents. I also rely on detailed wiring diagrams and troubleshooting apps, which make complex issues manageable. Trust me, the right equipment turns guesswork into precision, ensuring safety and efficiency.
Don’t Wait for a Crisis—Stay Ahead of Electrical Hazards
Your lighting system is more than just aesthetics; it’s a vital safety feature. Regular inspections, quick fixes, and knowing when to call a professional can keep hazards at bay. Remember, solving lighting issues isn’t just about convenience—it’s about protecting your loved ones from unseen dangers. Use your tools, stay vigilant, and don’t hesitate to seek expert help when needed. Your home’s safety depends on it.